In this blog post we are going to take a look at augmented reality apps and how to create them as Windows Store apps. When many people hear the words “augmented reality” the first thought that comes to mind is the large helmet type video games that never really took off in the 90’s. This was largely due to the high costs and bulky hardware that was required. This is also a bit inaccurate, as these video games were actually “virtual reality” games. Augmented reality (AR) is when an object that is not present in the real world, but appears to be because of a view showing a modified version of reality. Virtual reality is similar, but instead of being in the real world, the user is viewing a simulated version of the world.
The idea behind AR was first envisioned in 1901 by author Lyman Frank Baum in the booked titled “The Master Key”. In this book the main character has a pair of glasses that, when worn, would show the type of person someone was (i.e. good or bad). Now if this author’s name sounds familiar to you, but you can’t put your finger out it, he is best known for writing “The Wizard of Oz”.
In recent years AR has become increasingly popular. It has the smartphone to thank for this. With smartphones essentially being small-scaled computers filled with motion sensors, they have become the ideal platform for creating relatively inexpensive augmented reality applications.
With the release of Windows 7, Microsoft added in a new location and sensors platform. This sensor platform has grown significantly in Windows 8, to the point where many new computers have the same sensors that are found in most smartphones. This means that creating many of the AR applications that exist for smartphones can also be created as a Windows Store app.
Sensors in Augmented Reality Apps
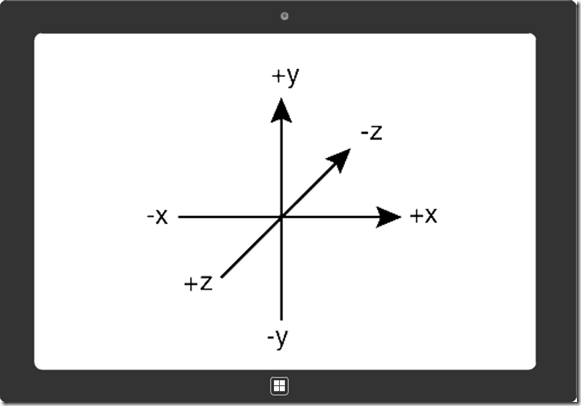
AR apps rely heavily on sensors. There are many different sensors that can be used. These sensors return a number of different measurements, many of them are relative to the x, y and z axis of the device. When facing the screen of the device, the x-axis runs in a left to right direction, the y-axis runs from the bottom up, and the z-axis runs from the back of the screen through to the front. Here is a diagram showing these axes relative to a device.
You can create a simple geospatial augmented reality app using nothing more than the location and compass sensors. The location sensor will provide you with the current location of the user and the compass will give you information on where the user is pointing the device. This will work fine in two dimensions, but if you want to take elevations into account, then you will need to look at the inclinometer sensor. The inclinometer measures the angle of rotation around the axes of the device and exposes these angles as yaw, pitch, and roll readings. Now as I mentioned, these will work fine for simple augmented reality apps, but you will likely find that things don’t move as smoothly on the screen as you would like.
Alternatively, the orientation sensor can be used instead of the inclinometer and compass. The orientation sensor combines the accelerometer, compass, and gyrometer (measures angular velocity about the axis) to report even more sensitive movements than any of those sensors can on their own. This makes the movement within the app much smoother, but also makes the mathematics much more complicated as a rotation matrix is returned by this sensor. As such, this sensor is often reserved for more complex augmented reality apps.
Tag Based Augmented Reality
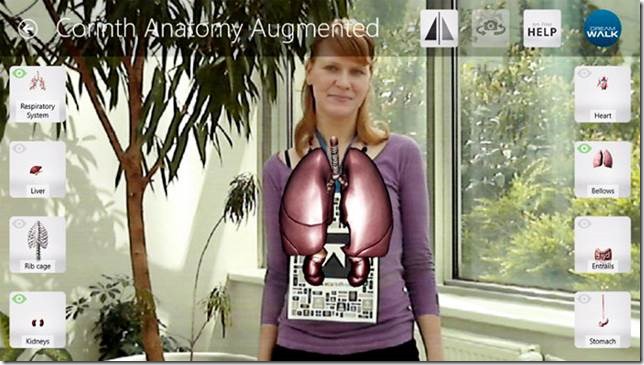
There are many different types of augmented reality apps out there. The two most common types are tag or geospatial based. Tag-based AR apps use markers or tags as points on which to render AR items on top of. Tags such as QR codes are commonly used, as they can be used to identify different types of objects and their orientation can often be tracked. A good example is the Corinth Micro Anatomy Augmented appin the Windows Store which uses tags to layer different anatomy systems over top the tag. Wearing the tag on your chest might seem a bit odd at first, but when you see the app in action, it’s pretty cool and educational too.
If you are interested in creating this type of AR application, then I recommend taking a look at the following projects for starters:
· ARTag
Also take a look at these blog posts:
· Augmented Reality with SLARToolkit on Windows Phone
· Augmented Reality Using C# and OpenCV
Geospatial Augmented Reality
Geospatial AR is when items are displayed in view based on their physical location. The most common app of this type shows nearby points of interests. A good example is the Nokia Here City Lens appfor Windows Phone 8.
Besides points of interests, these types of apps are often used to display other things:uch as;
· Pictures that have been taken around you
· Nearby information from Twitter, Wikipedia, Foursquare, Urban spoon
· Where you parked the car
· Golf course information, such as the location of the pin or hazards
Another type of data that is sometimes used are the stars. One of my favorite apps of this type is the SkyMap for Windows Phone and Windows 8. This app allows you to explore the wonders of the universe simply by pointing your device at the sky. In addition to this, you can tap on many of the objects on the screen to get more information.
As mentioned at the start of this blog, we are going to focus on creating this type of AR app. One of the best starting points for creating this type of app for Windows Store and Windows Phone is the GART CodePlex project. GART stands for geo augmented reality toolkit and was originally created for Windows Phone 7. Since then, support for Windows Phone 8 and, just recently, Windows Store apps has been added. This provides us with a great AR framework that already handles the orientation sensors and other calculations for us.
Creating a Bing Maps Powered App with GART
I’ve put together a nice sample app that is built on top of GART. This app makes use of Bing Maps in a four different of ways:
1. An interactive map is used to give an overhead view of all the nearby locations.
2. The app then uses the NAVTEQ point of interest data in the Bing Spatial Data Services as the data source that powers the app. By using the Bing Spatial Data Services anyone can easily create their own data source and modify this sample to use their data in minutes.
3. Rather than adding in all the functionality for calculating routes to selected locations the app launches the built-in Maps app in Windows 8 to provide this functionality. This greatly simplifies the sample application and also puts the user into an app they are familiar with when calculating directions.
4. The Bing Maps Imagery REST services are used to generate a static map image of a location which is included into an email when sharing a location.
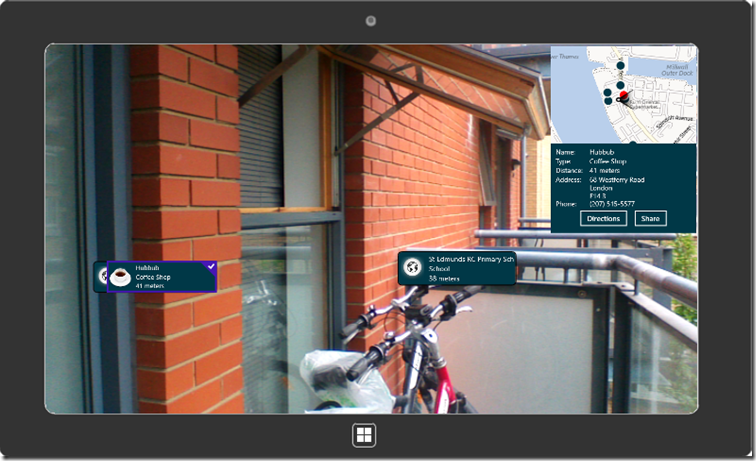
The sample app consists of a Windows Store and a Windows Phone 8 app which includes a lot of features and functionalities, many of which are mainly customizations to the UI. Rather than going through all 1,000+ lines of the sample app the remaining section of this blog post will show how to create a simplified version of the sample. This will allow us to focus on the key aspects of creating an AR app using GART and Bing Maps. You can access the full source code for the sample application here. You can find instructions on how to run that sample on the download page. When you run the full sample application, you will be able to find nearby locations simply by pointing your computer towards them. Here is a screenshot of the full sample application.
Creating the Visual Studio Solution
Before we can dive into AR functionality, we need to create the Visual Studio solution for the project. The following steps outline how to do this:
1. Start by opening Visual Studios 2012 and create a new project. In the window that opens, select Visual C# -> Windows Store. Select the Blank App template. Call the application BingMapsARand press OK.
2. Add a reference to the Bing Maps SDK. To do this, right click on the References folder and press Add Reference. Select Windows -> Extensions select Bing Maps for C#, C++ and Visual Basic. If you do not see this option, ensure that you have installed the Bing Maps SDK for Windows Store apps. While you are here, also add a reference to the Microsoft Visual C++ Runtime Packageas this is required by the Bing Maps SDK when developing using C# or Visual Basic.
3. You may notice that there is a little yellow indicator on the references that you just added. The reason for this is that C++ runtime package you have to set the Active solution platform in Visual Studio to one of the following options; ARM, x86 or x64. To do this, right click on the Solution folder and select Properties. Then go to Configuration Properties -> Configuration. Find your project and under the Platformcolumn set the target platform. For this blog post, I’m going to select x86. Press OK and the yellow indicator should disappear from our references.
4. Go to the GART CodePlex project, select the Source Code tab and press the download button to download a zip file containing the latest source code for this project. Note that you need to use the source code rather than the binaries of the project, as you will need to compile the application against the different platforms (ARM, x86, x64).
5. Once the source code is downloaded unzip the file and copy it over the GeoARToolkit folder to the folder your project is in. In Visual Studios right click on the solution and select Add -> Existing Project. Select the Gart.Win8.csproj file which is in the GeoARToolkitLibWin8GART.Win8directory.
6. In the BingMapsAR project add a reference to the Gart.Win8project.
7. Verify that the solution builds without any errors. If you do see a bunch of errors, right click on the Gart.Win8project and select properties. Select the Build tab and locate the Conditional compilation symbols textbox. Ensure that this textbox contains “WIN_RT;X3D” and then try rebuilding the solution.
Implementing the GART Project
The main control in GART is called ARDisplay. GART has a number of other controls which are added to the ARDisplay. These controls include;
· VideoPreview– A panel used to show the video preview from a rear facing camera if one is available.
· WorldView– Displays a virtual world in 3D space and applies matrix math to keep the virtual world aligned with what’s seen through the camera.
· HeadingIndicator– A simple user control used to show the direction in which the device is facing (similar to a compass needle).
· OverheadMap– Displays a Bing map that remains centered on the user’s location and shows nearby locations.
All of these controls can be easily customized using templates and styles in xaml. The ARDisplay control has a property called ARItems. This is a collection of data which is rendered by GART. To add your own data GART, it must inherit from the ARItem class. In this app we will be pulling in point of interest data from the Bing Spatial Data Services, so let’s create a class that inherits from the ARItem class that we can use to represent this data. In the BingMapsAR project add a folder called Models. Right click on this folder and select Add -> New Item and create a class file called PoiItem.cs. Open this file and copy and paste the following code:
using GART.Data;

namespace BingMapsAR.Models
{
public class PoiItem : ARItem
    {
public string Name { get; set; }

public string AddressLine { get; set; }

public string Locality { get; set; }

public string PostalCode { get; set; }

public string Phone { get; set; }

public string EntityTypeID { get; set; }

public double Distance { get; set; }
    }
}
Since we will be pulling in data from the Bing Spatial Data Services, we will need some classes to parse the JSON response from the service. To do this, create three class files in the Models folder called Response.cs, ResultSet.cs, and Result.cs. Open up the Response.csfile and add the following code:
using System.Runtime.Serialization;

namespace BingMapsAR.Models
{
    [DataContract]
public class Response
    {
        [DataMember(Name = "d", EmitDefaultValue = false)]
public ResultSet ResultSet { get; set; }
    }
}
Open up the ResultSet.csfile and add the following code:
using System.Runtime.Serialization;

namespace BingMapsAR.Models
{
    [DataContract]
public class ResultSet
    {
        [DataMember(Name = "__copyright", EmitDefaultValue = false)]
public string Copyright { get; set; }

        [DataMember(Name = "results", EmitDefaultValue = false)]
public Result[] Results { get; set; }
    }
}
Open up the Result.csfile and add the following code:
using System.Runtime.Serialization;

namespace BingMapsAR.Models
{
    [DataContract]
public class Result
    {
        [DataMember(Name = "LanguageCode", EmitDefaultValue = false)]
public string LanguageCode { get; set; }

        [DataMember(Name = "Name", EmitDefaultValue = false)]
public string Name { get; set; }

        [DataMember(Name = "DisplayName", EmitDefaultValue = false)]
public string DisplayName { get; set; }

        [DataMember(Name = "Latitude", EmitDefaultValue = false)]
public double Latitude { get; set; }

        [DataMember(Name = "Longitude", EmitDefaultValue = false)]
public double Longitude { get; set; }

        [DataMember(Name = "AddressLine", EmitDefaultValue = false)]
public string AddressLine { get; set; }

        [DataMember(Name = "Locality", EmitDefaultValue = false)]
public string Locality { get; set; }

        [DataMember(Name = "AdminDistrict", EmitDefaultValue = false)]
public string AdminDistrict { get; set; }

        [DataMember(Name = "AdminDistrict2", EmitDefaultValue = false)]
public string AdminDistrict2 { get; set; }

        [DataMember(Name = "PostalCode", EmitDefaultValue = false)]
public string PostalCode { get; set; }

        [DataMember(Name = "CountryRegion", EmitDefaultValue = false)]
public string CountryRegion { get; set; }

        [DataMember(Name = "Phone", EmitDefaultValue = false)]
public string Phone { get; set; }

        [DataMember(Name = "EntityTypeID", EmitDefaultValue = false)]
public string EntityTypeID { get; set; }
    }
}
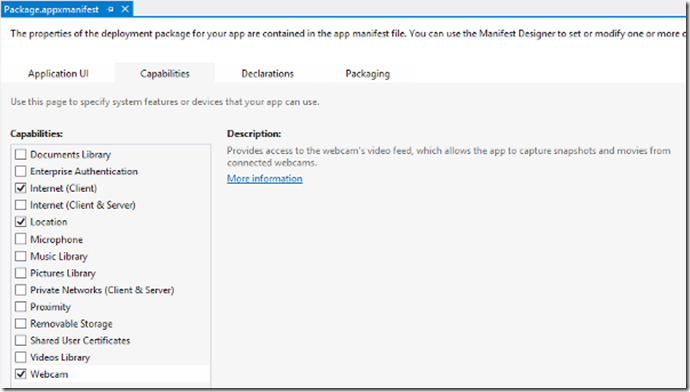
Next enable the app to use the user’s location, internet and webcam. To do this, open up the app manifest and go to the capabilities tab and check the Internet, Location and Webcam checkboxes:
Now open the App.xaml file and add a string parameter with a key name of BingCredentials and provide your Bing Maps key. Your App.xamlfile should look like this:
<Application
x:Class="BingMapsAR.App"
xmlns="http://schemas.microsoft.com/winfx/2006/xaml/presentation"
xmlns:x="http://schemas.microsoft.com/winfx/2006/xaml"
xmlns:local="using:BingMapsAR">
<Application.Resources>
<ResourceDictionary>
<ResourceDictionary.MergedDictionaries>
<ResourceDictionary Source="Common/StandardStyles.xaml"/>
</ResourceDictionary.MergedDictionaries>
<x:String x:Key="BingCredentials">YOUR_BING_MAPS_KEY</x:String>
</ResourceDictionary>
</Application.Resources>
</Application>
Open the MainPage.xaml file and add a reference to the GART and Bing Maps controls. After that you will want to add page resources that contain styles and templates that customize how the items are rendered. First create a DataTemplate called PoiItem. This template is used to define how a location item is displayed on the screen when you point your device at it. Then create a DataTemplate called PoiPushpin. This template is used to define how a location appears on the map. Create a Style that targets the OverheadMap control from the GART project. In the main Grid add an ARDisplay control and inside of it add VideoPreview, WorldView and OverheadMap controls. Putting this all together your MainPage.xamlfile will look like this:
<Page
x:Class="BingMapsAR.MainPage"
xmlns="http://schemas.microsoft.com/winfx/2006/xaml/presentation"
xmlns:x="http://schemas.microsoft.com/winfx/2006/xaml"
xmlns:local="using:BingMapsAR"
xmlns:d="http://schemas.microsoft.com/expression/blend/2008"
xmlns:mc="http://schemas.openxmlformats.org/markup-compatibility/2006"
xmlns:ARControls="using:GART.Controls"
xmlns:m="using:Bing.Maps"
mc:Ignorable="d">

<Page.Resources>
<DataTemplate x:Key="PoiItem">
<Border BorderBrush="Black" BorderThickness="2" CornerRadius="8" Background="#FF003847" Width="250">
<Grid Margin="4" Tapped="PoiItem_Tapped">
<TextBlock Text="{Binding Name}" Margin="5"/>
</Grid>
</Border>
</DataTemplate>

<DataTemplate x:Key="PoiPushpin">
<m:Pushpin m:MapLayer.Position="{Binding GeoLocation}" Background="#FF003847"/>
</DataTemplate>

<Style TargetType="ARControls:OverheadMap">
<Setter Property="Template">
<Setter.Value>
<ControlTemplate TargetType="ARControls:OverheadMap">
<Grid>
<m:Map x:Name="Map">
<m:MapLayer>
<m:MapItemsControl ItemTemplate="{StaticResource PoiPushpin}" ItemsSource="{Binding}"/>
</m:MapLayer>
</m:Map>
</Grid>
</ControlTemplate>
</Setter.Value>
</Setter>
</Style>
</Page.Resources>

<Grid Background="{StaticResource ApplicationPageBackgroundThemeBrush}">
<ARControls:ARDisplay x:Name="ARDisplay" LocationEnabled="True" MovementThreshold="100" LocationChanged="ARDisplay_LocationChanged" ServiceErrors="ARDisplay_ServiceErrors">
<ARControls:VideoPreview x:Name="VideoPanel"/>
<ARControls:WorldView x:Name="WorldView" ItemTemplate="{StaticResource PoiItem}"/>
<ARControls:OverheadMap x:Name="OverheadMap" Credentials="{StaticResource BingCredentials}" Width="300" Height="200" Margin="10" VerticalAlignment="Top" HorizontalAlignment="Right"/>
</ARControls:ARDisplay>
</Grid>
</Page>
Now open the MainPage.xaml.cs file and copy and paste the following code which contains all the required event handlers for the controls added to the MainPage.xamlfile along with some settings which we will use later. Also notice that we have added an event for when the MainPage has finished loading. In this event handler we will add an event that fires when the visibility of the main window changes. This will allow us to turn the services used by the ARDisplay on and off depending on if the app is in view. This will help conserve resources, as the services will not run in the background when the app isn’t being used.
using Bing.Maps;
using BingMapsAR.Models;
using GART.Data;
using System;
using System.Runtime.Serialization.Json;
using System.Text;
using System.Threading.Tasks;
using Windows.UI.Popups;
using Windows.UI.Xaml;
using Windows.UI.Xaml.Controls;
using Windows.UI.Xaml.Input;

namespace BingMapsAR
{
public sealed partial class MainPage : Page
    {
/// <summary>
/// Search Radius in meters
/// </summary>
private double SearchRadius = 300;

/// <summary>
/// Maximium number of items returned by the Bing Spatial Data Services
/// </summary>
private const int MaxResultsPerQuery = 30;

private Location LastSearchLocation;

public MainPage()
        {
this.InitializeComponent();
this.Loaded += MainPage_Loaded;
        }

private void MainPage_Loaded(object sender, RoutedEventArgs e)
        {
            Window.Current.CoreWindow.VisibilityChanged += async (s, a) =>
            {
if (a.Visible)
                {
//Start or restart the services used by the ARDisplay
                    await ARDisplay.StartServices();
                }
else
                {
//Stop the services used by the ARDisplay to free up those resources while the app is not in use.
                    ARDisplay.StopServices();
                }
            };
        }

private void ARDisplay_ServiceErrors(object sender, GART.ServiceErrorsEventArgs e)
        {
        }

private async void ARDisplay_LocationChanged(object sender, EventArgs e)
        {
        }

private void PoiItem_Tapped(object sender, TappedRoutedEventArgs e)
        {
        }
    }
}
Now we will take a look at the ARDisplay_ServiceErrors event handler. In this event handler we will want to loop through all the errors and create a message that we can display to the user. Since having a rear-facing camera is optional, we will ignore any errors related to the camera. Putting this together the ARDisplay_ServiceErrorsevent handler will look like this:
private void ARDisplay_ServiceErrors(object sender, GART.ServiceErrorsEventArgs e)
{
    StringBuilder sb = new StringBuilder();
foreach (var error in e.Errors)
    {
//Ignore errors from the camera. The camera is optional.
if (error.Service != GART.ARService.Camera)
        {
            sb.AppendLine(string.Format("There was a problem with {0}: {1}", error.Service, error.Exception.Message));
        }
    }

if (sb.Length > 0)
    {
new MessageDialog(sb.ToString(), "Error").ShowAsync();
    }
}
Inside the he ARDisplay_LocationChanged event handler, we will want to add the logic for finding nearby locations and adding them to the ARDisplay. Since we are using the NAVTEQ point of interest data sources from the Bing Spatial Data Services, we can add a bit of simple logic that searches the North American or European data source based on where the user is. To do this we simply need to check to see if the user’s current longitude is less than -30. If it is, then use the North American data source. We then just need to add our search parameters to the query URL and then loop through the results after downloading them and add them as PoiItem objects to the ARDisplay. Putting this together the ARDisplay_LocationChangedevent handler will look like this:
private async void ARDisplay_LocationChanged(object sender, EventArgs e)
{
// Last search location is now this location
    LastSearchLocation = ARDisplay.Location;

if(LastSearchLocation != null)
    {
//Remove items from ARDisplay
        ARDisplay.ARItems.Clear();

//Create Search URL for Bing Spatial Data Service
string baseURL;

//Switch between the NAVTEQ POI data sets for NA and EU based on where the user is.
if (LastSearchLocation.Longitude < -30)
        {
//Use the NAVTEQ NA data source: http://msdn.microsoft.com/en-us/library/hh478192.aspx
            baseURL = "http://spatial.virtualearth.net/REST/v1/data/f22876ec257b474b82fe2ffcb8393150/NavteqNA/NavteqPOIs";
        }
else
        {
//Use the NAVTEQ EU data source: http://msdn.microsoft.com/en-us/library/hh478193.aspx
            baseURL = "http://spatial.virtualearth.net/REST/v1/data/c2ae584bbccc4916a0acf75d1e6947b4/NavteqEU/NavteqPOIs";
        }

string poiRequest = string.Format("{0}?spatialFilter=nearby({1:N5},{2:N5},{3:N2})&$format=json&$top={4}&key={5}",
            baseURL, LastSearchLocation.Latitude, LastSearchLocation.Longitude, SearchRadius / 1000, MaxResultsPerQuery, OverheadMap.Map.Credentials);

        Response response = await GetResponse(new Uri(poiRequest));

if (response != null &&
            response.ResultSet != null &&
            response.ResultSet.Results != null &&
            response.ResultSet.Results.Length > 0)
        {
//Loop through the results and create PoiItems that can be added to the ARDisplay
foreach (var r in response.ResultSet.Results)
            {
                Location loc = new Location(r.Latitude, r.Longitude);

                PoiItem item = new PoiItem()
                {
                    Name = r.DisplayName,
                    AddressLine = r.AddressLine,
                    Locality = r.Locality,
                    PostalCode = r.PostalCode,
                    EntityTypeID = r.EntityTypeID,
                    Phone = r.Phone,
                    GeoLocation = loc,
                    Distance = Math.Round(ARHelper.DistanceTo(loc, LastSearchLocation))

                };
                ARDisplay.ARItems.Add(item);
            }

//Set the map view to show all the locations.
            OverheadMap.Map.SetView(ARDisplay.Location, 15);
        }
    }
}
You will notice that a method called GetResponse is missing. This method is used to call REST services and serialize the response into a Response object. Add the following method to the MainPage.xaml.csfile:
private async Task<Response> GetResponse(Uri uri)
{
try
    {
        System.Net.Http.HttpClient client = new System.Net.Http.HttpClient();
        var response = await client.GetAsync(uri);

using (var stream = await response.Content.ReadAsStreamAsync())
        {
            DataContractJsonSerializer ser = new DataContractJsonSerializer(typeof(Response));

return ser.ReadObject(stream) as Response;
        }
    }
catch (Exception)
    {
return null;
    }
}
Inside the PoiItem_Tappedevent handler, we can add some logic to get the item the user tapped on. This may be useful if you want to get additional details about the selected location. You can use the following code to get the item that the user tapped on.
private void PoiItem_Tapped(object sender, TappedRoutedEventArgs e)
{
    ARItem selectedItem = null;

if (sender is Grid)
    {
        selectedItem = (sender as Grid).DataContext as ARItem;

//Do something with the selected item
    }
}
At this point you have all the functionality needed to run this simple AR app. Here is a screenshot of the app near where I live.
Changing the Data Source
Since this sample app makes use of data stored in the Bing Spatial Data Services, you can create your own data source to create a custom AR app. You can find information on how to create and upload your own data source to the Bing Spatial Data Services here.
Once you have a data source uploaded to the Bing Spatial Data Services you can modify the BingMapsAR project to make use of your data. The first step is to update the PoiItem.cs file which is located in the Models folder. This file describes the format of the data in your data source. Simply add and remove properties such that they match the column header names and types in your data source. Next open the MainPage.xaml.cs file and find the ARDisplay_LocationChanged event handler. In this event handler is some logic for switching between the NAVTEQ NA and EU data sources based on where the user is. Remove this logic and set the baseURL value to the query URL of your data source. Details on how to find the query URL of your data source can be found here. Once you have done this, you can customize what information is being displayed to the user by changing the properties being bound in the ItemPanel and PoiItem DataTemplate in the MainPage.xamlfile.
– Ricky Brundritt, EMEA Bing Maps Technology Solution Professional

.png)
